FolderMill can help you automatically print various documents, images, or other types of files daily. The program can seamlessly print large volumes of different files: PDFs, office documents, text files, drawings, images, barcodes & labels, and many other file types.
Printing multiple PDF files to any printer
FolderMill detects incoming PDF and other types of files and automatically processes them. It can even perform several assigned printing tasks at the same time. The program supports any kind of printing device available in your system: laser and inkjet printers, plotters, multi-functional (MFP), all-in-one (AIO), home and office printers, as well as virtual or network printers. FolderMill saves applied print settings (i.e., paper size, orientation, etc.) and printer properties since the latest session to use them later again.
A wide range of basic and advanced print settings are available that allow you to set up the printing process exactly the way you need it.
How to set up automatic printing of documents
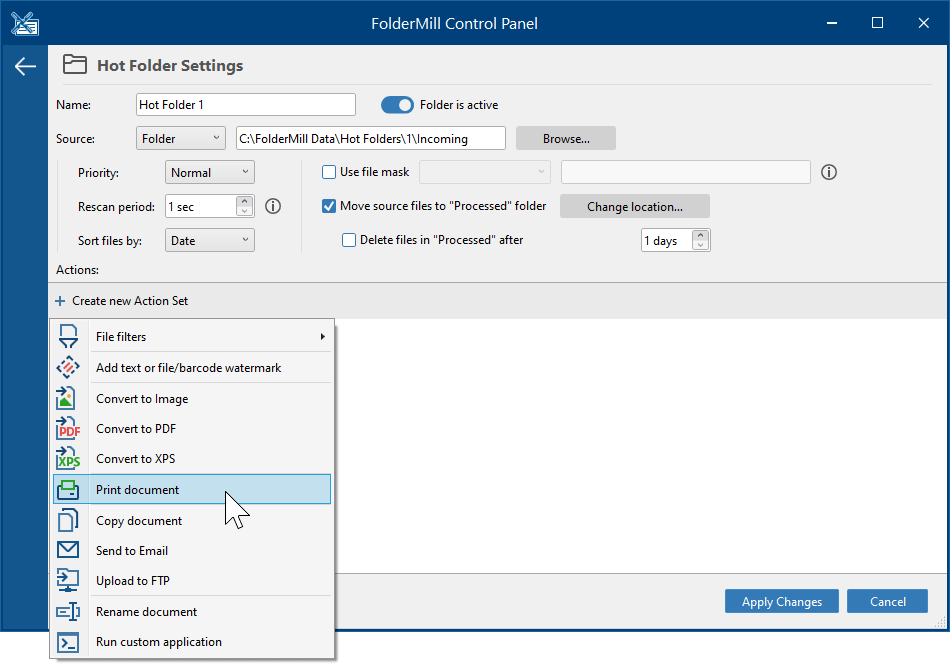
It is very easy to configure FolderMill for automated printing of documents. Simply create a Hot Folder, add Print document Action, specify desired print settings, and let FolderMill start checking new files with the Start button.
Copy files that need to be printed out to the Hot Folder. Your incoming documents will be automatically printed according to the applied print settings. Processing takes place in real-time so that you can take the printouts from the printer tray right away.
Quick steps on printing PDF, documents, images, or other files:
- Open FolderMill Control Panel
- Create a new Hot Folder
- Select the Print document action
- Click OK and then Apply changes
- Press the Start button on FolderMill Control Panel
General Settings of Print Document Action
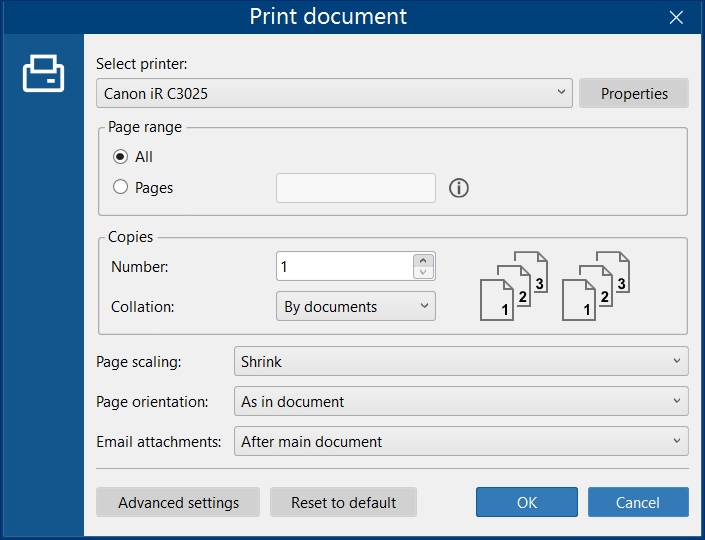
Printer and printer Properties
- Select the printer
It can be a local, virtual, wireless, network, or any other type of printer available; - Properties
These are native printer properties, which will depend on your printer driver. For example, you can select duplex printing, paper tray, page orientation, paper type and size, print quality, page order, color management and other options (they may vary depending on your printer brand and model). Once specified, these printer properties are saved and used by FolderMill.
For instance, you can create several different Print document Actions to print the documents on the same printer, but with different settings – both print settings and printer properties.
Page range

Choose between Print all pages and Print page range. To select a specific range of pages, type in their numbers separated by a comma, e.g., 1-5,7,23-25 (starting from the beginning of the document). You can set:
- Single pages. For example: 1,3,5
- Page ranges separated by commas. For example: 1-5,20-25
- Pages from the end of a document (using the syntax last). For example: last,last1,last2,last3...
- Complex page range. For example: 1,5-10,12-last
To specify pages from the end of a document, use the syntax last:
- last – the last page
- last1 – page before the last one (the second page from the end)
- last2 – third page from the end
- etc.
Please use comma and/or dash to indicate page range properly. For instance, if you need to print only the first two pages of a document, enter "1-2" as a page range (not just "2").
Number of Copies

Select the number of copies to print for each document.
Page Collation

By documents (default option) or By pages. Page collation means sorting the documents and their copies so that they are printed in sorted sets. It's a handy feature if you have multiple copies of several documents to print.
- By documents
All copies of a document are printed before printing the next document. Document copies are printed together – all printouts are arranged document copy by document copy: document 1 (copies #1,2,3...), then document 2 (copies #1,2,3...), then document 3 (copies #1,2,3...), and so on. - By pages
All copies of a page are printed before printing copies of the next page. Page copies are printed together – printouts are arranged page by page: pages #1,1,1, pages #2,2,2, pages #3,3,3, etc. of first document's copies; then pages #1,1,1, pages #2,2,2, pages #3,3,3, etc. of second document's copies, and so on. - As in printer
The page collation method is determined by your printer driver's settings (Printing preferences).
Page scaling

Shrink (default option), Fit, Original, Fill, Booklet, Zoom level.
- Shrink
Shrink-to-page option: prints "as is" or, if a page is larger, decreases page size to fit printable area. It resizes only large pages to fit the paper and prints small pages as they are; - Fit
Fit-to-page option: fits page size to printable area. Scales small pages up and large pages down to fit the paper; - Original
"As is" option: prints pages or images in their original size; - Fill
Fill-to-page option: print a full page from edge to edge on the short side. No matter the size, the page will fill the whole sheet of paper or even beyond the paper (on the long side); - Booklet
Booklet option: lays out the pages two per sheet, as a booklet (works only if Adobe Acrobat is used as a print engine, otherwise we suggest using Multiple pages per sheet mode); - Zoom level
Custom page zoom option: allows you to set up the scaling as a percentage of its original size, e.g., 110% or 50% of page size. This value can be changed in the Action's Advanced Settings.
Page orientation

You can manually set orientation of pages to portrait or landscape. Portrait and landscape refer to different orientations of the paper – whether it should be printed vertically or horizontally. Available options are:
- Portrait (set vertical orientation)
- Landscape (set horizontal orientation)
- As in document (keep the same as the document's orientation)
- As in printer (keep page orientation as set in Printer Properties)
Email attachments
Ignore, After main document, Before main document, Print only attachments.
Enable or disable and select the way of printing attachments for EML and MSG e-mail messages. Not only can you print multiple Microsoft Outlook email messages, but also files attached to the emails (all types that are supported by FolderMill). More options to configure attachments' processing are available in the Advanced settings.
Advanced Settings of Print Document Action
Task processor
Timeout
Default: 5 minutes, 10 minutes
Set a time limit for processing a single file. After this time is over, FolderMill will proceed to another file. Please do not change this parameter unless our support service advises it.
Memory leaks limit
Default: 512 MB
Set limit to random-access memory allocated for FolderMill's work. If the amount of memory leaks exceeds a certain limit, the program engine restarts automatically without interruption. This lets FolderMill process any number of files per session.
Restart after jobs number
Default: 4096 jobs
Automatically restart the program engine after a certain number of print jobs.
Enable custom scripts
Default: Yes
Custom Python scripts may be used that change the program's default behavior. They are enabled by default. Turning them off returns the program to the default state.
Display progress for each file
Default: No
The program can show the status of each file being processed on the Control Panel. Disabling this feature may enhance performance when handling small files, but progress bar indicators will not be displayed for each file.
Raster image engine
Default: GDIPlus
Set a raster image engine. You can choose between GDIPlus and Graphic Processor. Please do not modify this parameter unless advised by our support service.
Rebex MHT to PDF engine
Default: AsposeWords
Select the primary component for MHT to PDF conversion. Please do not modify this parameter unless advised by our support service.
Extract email attachments engine
Default: Rebex
Set the primary component for email attachment(s) extraction. Select between Rebex and Outlook. Don't change this setting unless advised by our customer service.
Get file list from Excel file engine
Default: Excel
Set the primary component for getting the file list from XLS/XLSX/CSV files. Don't change this setting unless advised by our customer service.
OCR engine
Default: TesseractOCR
Select the primary component for OCR processing. To achieve better OCR results, change it to the Acrobat engine if you have Adobe Acrobat installed.
Disabled helpers
Default: none
Disable specific components FolderMill that are used by the program to print certain types of files. Please do not change this parameter unless our support service advises it.
Kill hanging processes
Default: Yes
The program may utilize the API of Microsoft Office and other applications during its operation. When this option is enabled, it will terminate background processes that were started by third-party software such as Microsoft Word, Excel, and others, if they are no longer required.
Use internal engines whenever possible
Default: Yes
With this option enabled, the program will try using its internal (built-in) engines first. If that is not possible, external components will be used for file processing.
Files and folders
Keep source files available for editing
Default: No
Enable this setting to be able to open and edit the source files when they are being processed by FolderMill.
Temp folder
Default: %TEMP%
Change the folder where temporary files created by FolderMill are located. By default, it is "C:\Users\[User]\AppData\Local\Temp".
Password list
Default: none
Enter the password for the source file(s) to batch convert password-protected documents. If you have more than one file secured with passwords, input several passwords, each on a separate line.
Restore subfolders
Default: Yes
Keep the same subfolder structure as in the input folder (if a folder is set as a source).
Recurse subfolders
Default: Enabled
Enable or disable subfolder recursion. When enabled, the program will process files from subdirectories too. To exclude certain subdirectories, optionally enter their paths in the Exclude certain subfolders field.
Existing file action
Default: Create new file
Define what FolderMill should do if the output folder already has a file with the same filename: Create new file, Overwrite, Skip.
Destination file password
Default: none
Enter a password to password-protect converted files. Password protection will apply to all successfully processed files.
Keep output files on any error
Default: Yes
Define what FolderMill should do if it encounters an error (for example, if a watermark file is missing). If changed to No, the program will not save files in the output folder in case of an error.
Output filename template
Default: {*SrcFilename}{*WorksheetName}{*SrcFileMPageNo}.{*DstFileExt}
Modify the output file name template using macros and/or arbitrary text. The default output name is: {*SrcFilename}{*WorksheetName}{*SrcFileMPageNo}.{*DstFileExt}. Click the {=} icon to add other built-in macros, such as date/time, source file's number of pages, and more.
- {*srcfilename} – source file name;
- {*worksheetname} – worksheet file name (for Excel or CAD files);
- {*srcfilempageno} – source file page number ("M" stands for multiple pages, this macro does not add page number "1" to single-page files);
- {*dstfileext} – destination file extension.
You can combine macros with your own text, including spaces and dots. For example:
Item {*listitemno} {*srcfilename}.{*dstfileext} | Created: {*date(dd.mm.yyyy)}
Note: macro names are not case-sensitive. That means, both {*dstfileext} and {*DstFileExt} will work the same way.
Keep source files' original date/time
Default: No
With this option enabled, you can save the source files' properties and keep them in the converted files' properties: last write (last modified) time and date.
File extension aliases
Default: TXT=bat,cmd,c,cpp,h,java,js,php,ps1,ps1m,py,vb,vbs
If you have files of a certain supported format but with a non-standard file extension, FolderMill won't process these files. Still, there is a way to process them. With the help of File extension aliases, it is possible – just associate your files with an existing supported format.
Document printing settings
Page range selection
Default: All
Select only Odd or Even pages.
Copies
Default: 1
Select how many document copies should be printed.
Max copies per job
Default: Not set
Sometimes, the size of the print job and the spool file can become very large, slowing down the printing process. By enabling this setting, you can split large print jobs that contain documents with multiple copies into smaller parts. This can potentially reduce the spool file size and expedite printing, especially if the spool file size becomes exceedingly large.
Collate
Default: By documents
Set page collation to By documents, By pages, or As in printer.
| By documents | All copies of a document are printed before printing the next document. Document copies are printed together – all printouts are arranged document copy by document copy: document 1 (copies #1,2,3...), then document 2 (copies #1,2,3...), then document 3 (copies #1,2,3...), and so on. |
| By pages | All copies of a page are printed before printing copies of the next page. Page copies are printed together – printouts are arranged page by page: pages #1,1,1, pages #2,2,2, pages #3,3,3, etc. of first document's copies; then pages #1,1,1, pages #2,2,2, pages #3,3,3, etc. of second document's copies, and so on. |
| As in printer | Printouts are collated according to your printer's settings. To check them, go to Control Panel\All Control Panel Items\Devices and Printers, then right-click a device and select Printing preferences. |
Duplex mode
Default: As in printer
Set duplex (double-sided printing), simplex mode (one-sided printing), or let the printer control this setting.
| One-sided (Simplex) | Printing on one side of paper. |
| Long-edge binding | Double-sided printing using a vertical page turn in portrait, and horizontal page turn in landscape orientation. |
| Short-edge binding | Double-sided printing using a horizontal page turn in portrait; and vertical page turn in landscape orientation. |
| As in printer | Printing mode is the same as in your printer's settings (Printing preferences). |
Page print order
Default: Direct
Set the order of printing pages in a multipage document to Direct or Reverse.
Print job name
Default: {srcfilename}{sppgroup(" - part {0} of {1}")}.{srcfileext}
Set a name for the print job to help you see what's being printed on the printer display. By default, it is set to source file name – dot – source file extension.
Disable printing empty pages
Default: No
The program can detect blank pages so you can prevent printing them automatically.
Print engine
Default: default print engines
FolderMill can switch between different modules if an certain file cannot be handled properly. The modules include Cnv2Pdf, CADlib, Patagames, EDrawingsHelper, and some others. Don't change this setting unless it was advised by our customer service.
Remember printer name and settings
Default: Yes
Specifies whether the program should remember printer name and settings since the previous print session.
Get print settings from filename
Default: Yes
With this feature enabled, the program can receive and apply print settings from the file's name.
Print on default printer
Default: No
FolderMill allows you to print on the default printer set in Windows, regardless of the printer chosen in the program's interface. To verify the default printer, navigate to the Control Panel, select Hardware and Sound, then click on View devices and printers.
Consider print page range as error
Default: No
Choose whether the program should consider an invalid (non-existent) page range as an error. If set to Yes, the program will record an error in the logs in case of invalid page range. The file will be sent to the "Unable to process" folder.
Page layout
Rasterization resolution
Default: 300 dpi
Set DPI (Dots Per Inch) which defines output image resolution. Resolution can be set in a range between 54 to 16384.
300 DPI is suitable for standard quality, e.g. text documents. 600 or higher is good for high-quality images or photos. Generally, we don't recommend setting it lower than 300 (the output file may have low quality) or higher than 1200 (processing may take much time).
Use rasterization anti-aliasing
Default: Yes
Use a rasterization algorithm with anti-aliasing. Anti-aliasing helps make edges of an image smoother (transition is more gradual), and visually reduces the stair-stepped pixels artifact.
Paper size
Default: As in printer
Select paper size (page format), e.g., A4 or Legal.
| As in printer | The paper size is controlled by your printer's settings. To check them, go to Control Panel\All Control Panel Items\Devices and Printers, then right-click a device and select Printing preferences. |
| Page size based | The paper size is controlled by FolderMill. It is set automatically depending on the paper size of pages. As a result, each page will be printed with width and height dimensions, which fit best. |
Page orientation
Default: As in document
Set the orientation of pages to portrait or landscape (horizontal or vertical layout).
| Portrait | Set vertical orientation. |
| Landscape | Set horizontal orientation. |
| As in document | Keep the orientation of the original document. |
| As in printer | Keep page orientation as set in your printer's settings (Printing preferences). |
Auto rotate
Default: Clockwise
FolderMill auto-rotates pages automatically so that they fit a sheet of paper. The program automatically detects the best page orientation for each document and rotates it to landscape or portrait. Choose which way the pages should be turned – Clockwise or Counterclockwise – or disable auto-rotation by selecting None.
Color mode
Default: As in printer
Set color mode to:
- Grayscale – grayscale mode, print using various shades of grey
- Color – color mode, printing in color mode
- As in document – printing document pages in their original color
- As in printer – as in your printer properties (Printing preferences)
Don't change the default setting if you want to keep some special color properties defined in your printer's settings.
About Color mode: As in document
You can change Color mode to As in document to print pages in their original color. The program will choose either Color or Grayscale mode for each page – depending on their contents.
That means, the actual printing will be based on the page's color or absence of color. If at least one pixel of the original file has color, the whole page will be considered as colored and thus printed in color.
You can also tweak the color detection threshold by modifying the Min pixels quantity threshold (Print document Action → Advanced settings → Min pixels quantity threshold). We recommend changing it to 1% and increasing this value if this doesn't help (try setting it within a range of 1-50%).
When using Color mode: As in document and Min pixels quantity threshold: 1% (or higher value) make sure that color mode of your printer is set to printing in "Color" or "Auto" or a setting with a similar name. You can check it in the printer properties via the Properties button.
If "Black and White", "Grayscale" or a similar option is set in the printer properties, FolderMill will not be able to correctly render pages as coloured or grayscale before printing.
Color mode for selected pages
Default: None
Select different color modes (Color/Grayscale/As in document/As in printer) for different pages or page ranges.
Printer resolution
Default: As in printer
You can get a quick version (draft) of your documents or a slower, but high-quality output. Change printer resolution to:
- As in printer – as in your printer's settings (Printing preferences)
- High – print at a high-quality level
- Medium – print at a standard quality level
- Low – print at a low-quality level
- Draft – print low-quality draft output
Most printers support this feature.
Scale mode
Default: Shrink
Scale mode defines page sizing and scaling: how large or small the printouts should be. You can change it to:
| Shrink | Shrink-to-page option: decreases page size to printable area. It resizes only large pages to fit the paper and prints small pages in the original size. This is the default option. |
| Fit | Fit-to-page option: fits page size to printable area. Scales small pages up and shrinks large pages down to fit the paper. |
| Original | "As is" option: prints pages or images in their original size. |
| Fill | Fill-to-page option: print a full page from edge to edge on the short side. No matter the size, the page will fill the whole sheet of paper or even beyond the paper (on the long side). |
| Zoom level | Set a specific scaling (e.g., 50% or 110%) in relation to the printable area. |
Print as image
Default: No
Convert documents into a raster graphic (bitmap) image before printing. This feature may be handy if you have some print quality issues (e.g., characters look incorrect, or the overall quality looks poor). However, the rendering may take more time.
Print crop marks
Default: No
Add crop marks (cut marks, trim marks) that are thin lines printed in the corners of your document sheets of paper to show where to trim the paper.
Vectorize text
Default: No
Turn text characters into outlines (curves) before printing. When printing, this will create a document with vectorized characters, and the text will be non-searchable.
Horizontal alignment
Default: Center
Align the page or image to a side of a sheet of paper horizontally. Possible values:
- Left
- Center
- Right
Vertical alignment
Default: Center
Align the page or image to a side of a sheet of paper vertically. Possible values:
- Top
- Center
- Bottom
Horizontal offset
Default: 0
Shift the page or image's position horizontally (X-axis) using a custom value, which equals 0.01 inch. Zero (0) is the starting point located in the top left corner of a page or image. You can enter any positive or negative value.
Vertical offset
Default: 0
Shift the page or image's position horizontally (Y-axis) using a custom value, which equals 0.01 inch. Zero (0) is the starting point located in the top left corner of a page or image. You can enter any positive or negative value.
Ignore printable area of the page
Default: No
Ignore the printable area applied by default by some printers and use the dimensions of the paper sheet only. Sometimes unnecessary margins are added by printer hardware or the printer driver.
Use rasterization anti-aliasing
Default: Yes
Use a rasterization algorithm with anti-aliasing. Anti-aliasing helps make edges of an image smoother (transition is more gradual), and visually reduces the stair-stepped pixels artifact.
Single print job mode
This section contains settings related to the Single print job mode that can be optionally enabled. Using this mode allows you to:
- Print your files in the correct order. The Single Print Job mode prevents Windows print spooler or other software from causing any mix-ups.
- Avoid confusing your documents with those of other users printing to the same device. Your files will be sent to the printer without interruption or the inclusion of other users' print jobs.
- Reduce time spent sorting through printouts. Manual collation of printouts is no longer necessary – everything is printed exactly as you planned.
Enabled
Default: No
Enable the Single print job mode. It is disabled by default.
Print extra blank even page in duplex mode
Default: Yes
When using both Single print job and Duplex mode (printing on both sides of the paper), an extra blank even page is added to each document with an odd number of pages. It is set by default.
If you want to print the whole set of documents without blank pages in the middle, disable this option.
Print cover page on front side of paper
Default: No
If you use cover pages in Single print job and Duplex mode (printing on both sides of the paper), you may experience an issue when the cover page is printed somewhere in the middle (not as first page). To make sure it is always on the first page of paper, activate the option to Print cover page on front side of paper.
Single print job name
Default: Single print job
You can set a specific name for a batch of files printed in Single print job mode. It may be convenient to see what's printing and identify which job is having issues in case of any issue or error. Besides, if you're printing to a virtual printer, the output files' name usually matches the print job's name.
Attachments
Sort attachments
Default: Name
Select how file attachments should be sorted in the output folder:
- Unsorted
- Name
- Type
- Size
- Date
- Name descending
- Type descending
- Size descending
- Date descending
Attachments of unknown types action
Default: Ignore
Set what to do with attachments that are not recognized. When this setting is set to Ignore, the program will skip file attachments if their format cannot be recognized. You can change it to Replace with placeholder (see the next setting Attachments placeholder template to define how it should look) or Try to process.
Attachments placeholder template
Default: Filename
Configure placeholder(s) that should be inserted instead of unknown attachments (see previous setting). Attachments are replaced with a blank-page file with original filename (Filename). You can select your own file (Browse for file) or create a custom template (-Open Attachments placeholder Designer-) as an alternative.
Include attachments by file mask
Default: *.*
Use an expression that allows converting only certain attachments by mask. For example, type *.pdf to convert PDF attachments only. Or enter attachment.* to convert only files containing the word "attachment" in the filename. You can add one or several masks at the same time (each on a separate line).
Exclude attachments by file mask
Default: none
Use an expression that restricts processing of certain attachments by mask. You can add one or several masks at the same time (each on a separate line). For example: *.docx
Print attachments
Default: After main document
Set the method of processing attachments. If you print files that have attachments, such as emails or PDF Portfolio documents, you can select what FolderMill should do with them:
- Ignore – ignore attachments
- After main document – print attachment after a document
- Before main document – print attachment before a document
- Print only attachments – print attachments only
In the same print job with document
Default: No
Printing, for example, an email plus its attachments in the same print job ensures they are printed one after another. It can be handy if you want to staple the attachment and the document together after printing.
Paper sources
Paper source for documents
Default: As in printer
Select the input tray for paper, for documents.
Possible options:
| As in printer | The paper source is the same as in your printer's settings (Printing preferences). |
| Page size based | The paper source is selected automatically by FolderMill to fit the page size of documents the best way. |
Paper source for selected pages
Default: List is empty
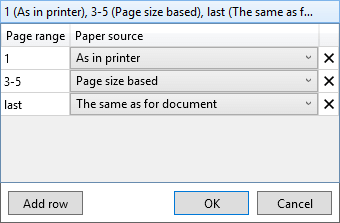
Select input tray(s) for paper, for a specific page range. It has the same options as Paper source for documents plus The same as for document.
Paper source for cover pages
Default: The same as for document
Select the paper source for cover pages. It has the same options as Paper source for documents plus The same as for document.
Paper source for cover page before all attachments
Default: The same as for document
Select input printer tray (paper source) for cover page before all attachments. The cover page can be configured via the Cover page before all attachments template parameter.
Paper source for cover page before each attachment
Default: The same as for document
Select input printer tray (paper source) for cover page before each attachment. The cover page can be configured via the Cover page before all attachments template parameter.
Paper source for folder cover pages
Default: The same as for document
Select the paper source for folder cover pages. It has the same options as Paper source for documents plus The same as for document.
Paper source for report page
Default: The same as for document
Select the paper source for report pages. It has the same options as Paper source for documents plus The same as for document.
Document converting settings
Convert engine(s)
Default: none
Enter name(s) of specific converting engines to change the priority of file conversion engines. Don't change this setting unless it was advised by our customer service.
Service pages
Print cover page
Default: No
Enable printing an additional cover page to distinguish between printed documents (or copies). The cover page is a sheet of paper that separates each newly printed document from the previous one. You can select a cover page template that you prefer.
Cover page template
Default: Filename with FolderMill logo
Set a cover page template for Print cover page setting. You can use various page layouts, select your own file (-Browse for file-), or create your own template using the Cover page Designer (-Open Cover page Designer-).
In the same print job with document
Default: Yes
Print the document and the cover page in the same print job. This ensures they are printed one after another. It can be handy, for example, if you want to staple the cover page and the document together after printing. Or, you can disable it if you want to print them on different printer trays.
Print service pages only
Default: No
Print service pages (cover and/or report pages) only, without the documents.
Multiple pages per sheet
Multiple pages per sheet
Default: Do not rearrange pages
With FolderMill, you can print multiple pages of a multi-page document on a single sheet of paper.

In this mode you can only arrange pages of a multi-page document (but not several separate files), since FolderMill processes each file separately. Therefore, your source file must be a multi-page document for this mode to have an effect.
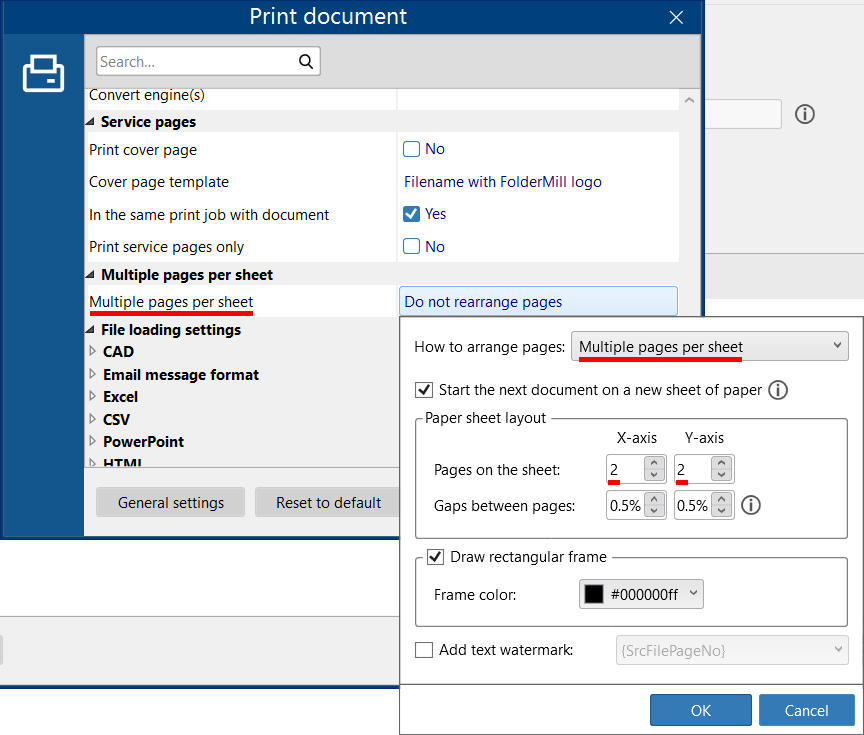
To print in Multiple pages per sheet mode:
- Create a new Hot Folder;
- Add new Print document Action;
- Select the printer you want to use;
- Switch to Advanced settings;
- Find "Multiple pages per sheet" setting (start typing its name in the search bar)
- Select the number of pages on the sheet by X-axis and Y-axis and change optional parameters if necessary;
- Click OK and OK again to save this Action;
- Click Apply changes;
- Start FolderMill Processor;
- Try printing your files by copying them to the Source.
Optional parameters include:
- Setting gaps between pages. Define the horizontal and vertical gaps between arranged pages. These gaps are set as a percentage of the sheet's longer side.
- Drawing a rectangular frame. You can add a frame around each arranged page and choose any color for it.
- Adding a text watermark. You can add a text watermark to each page. By default, it is the source file page number ({*SrcFilePageNo}), but you can customize it according to your needs.
Booklet printing mode
The Multiple pages per sheet mode also allows you to create booklets. To do it, select the Booklet printing option next to "How to arrange pages".
This mode arranges two pages on each paper sheet and prints on both sides of the paper in a specific sequence, thus creating a booklet. After folding and stapling the printed sheets, you'll have a brochure or a saddle-stitched booklet.

File loading settings
The File loading settings section includes settings that determine how FolderMill handles incoming files at the start of processing. You can adjust in-depth settings for CAD drawings, email message files, Excel files, plain text, ZPL files, and more.
Overprint
Default: No
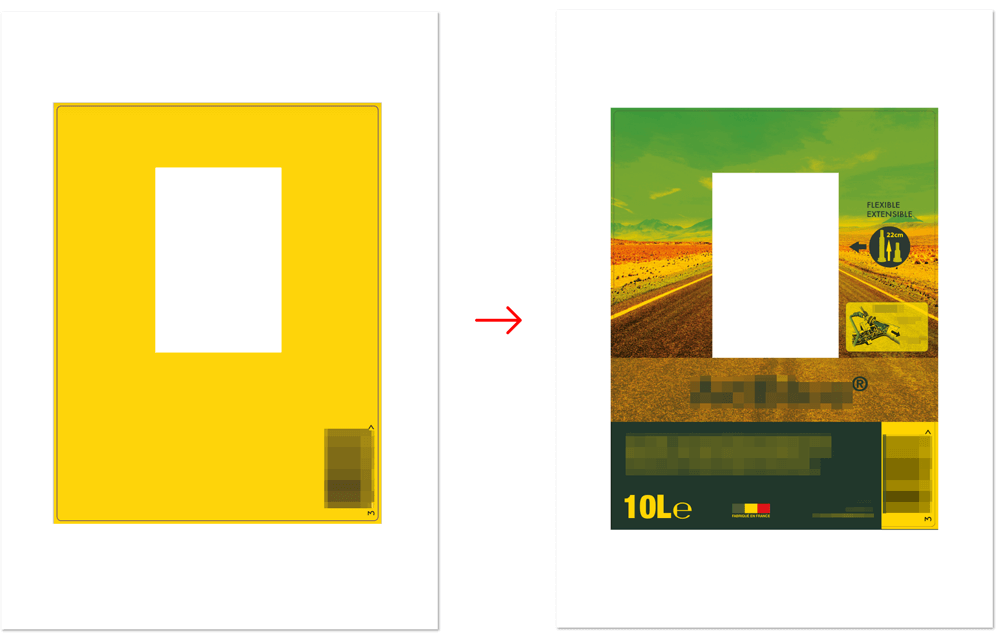
The "Simulate Overprinting" feature adjusts how overlapping colors print.
This feature allows to simulate the blending and overprinting of colors in the color-separated output. When it's disabled, the color is painted over another and replaces the underlying color. In FolderMill, this applies to PDF documents only. To enable it, set Overprint:Yes in Print document Action's Advanced settings.
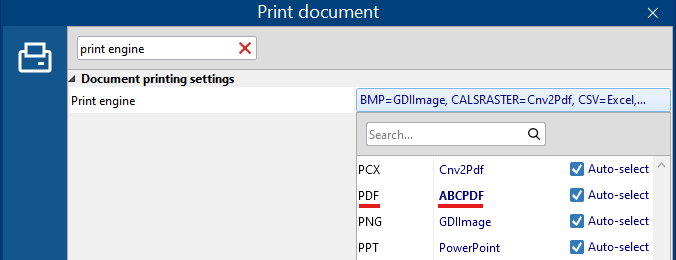
Note: when using this feature, ensure to have the Print engine set to ABCPDF.
The "Simulate Overprinting" feature can be found in various professional desktop publishing software. When preparing document layouts in Adobe Illustrator, Adobe InDesign, Adobe Reader, you'll find an option to "Simulate Overprinting" for print production. This feature mimics the blending and overprinting of colors in color-separated output.
FolderMill printing tips & tricks
You can also configure FolderMill to perform even more complex and specific tasks. Here are a few tips on how to streamline some of them.
Instantly send files to Hot Folder using context menu
Select one or more files, right-click them and find Process with FolderMill option in the context menu, then send files to an existing Hot Folder:
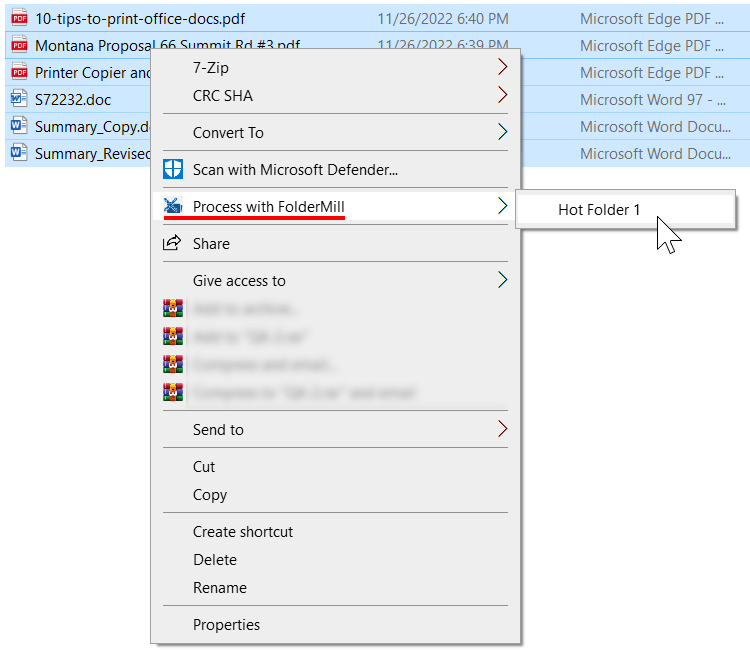
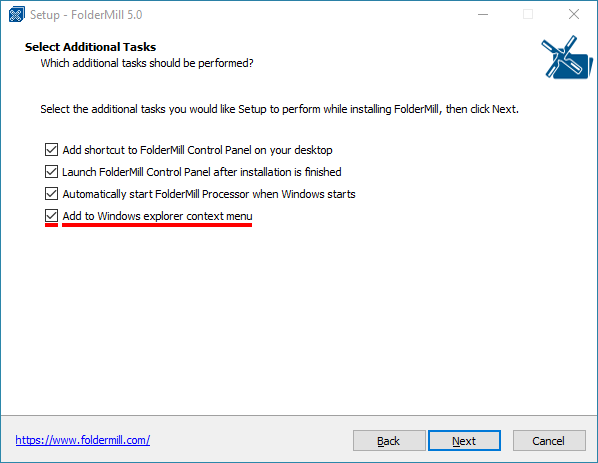
When you send files to a Hot Folder this way, you will be prompted to specify the number of copies of these documents. To enable this feature, please don't forget to check the box next to Add to Windows explorer context menu option on FolderMill installation.
Automatically select paper source by document page size
If your printer provides a variety of paper sources for printing, you can let FolderMill automatically select the most appropriate paper tray, depending on page size of each incoming document. To enable this function, add Print Document Action, open Advanced Settings, find Paper size and switch it to Page size based.
How to control print settings from filename
Moreover, you can customize individual print settings by adding the values at the end of the document's name. Rename your document according to this pattern:
your-original-filename-copies=2-duplex=1-tray=2-type=244-pagerange='1,5-10'-papersize=Letter-color=1.pdf
| copies=2 | Sets the number of copies; |
| duplex=1 | Sets one-sided or double-sided printing mode: 1 – simplex; 2 – duplex; 3 – duplex horizontal; |
| tray=2 | Sets paper source by tray ID; |
| type=244 | Sets paper type ID (for HP printers only); |
| pagerange='1,5-10' | Sets exact pages to be printed: |
| papersize=Letter | Sets the paper size format (A4, Letter, etc.); |
| color=1 | Sets color mode: 1 – Grayscale, 2 – Color, 3 – As in printer. |
As you can see, it is possible to change values for the number of copies, set duplex mode, select printer tray, paper type ID, page range, and more — for each file.
See further details in our how-to article: Apply Print Settings from Filename.
Print specific documents using filename filter
You can configure FolderMill so that it processes only certain types of files using Filter by filename Action. This Action can select files by name or file extension, for example, to print only PDF files. You can also skip files, which shouldn't be processed, using the Process all document except those… option.
Simultaneously print documents on different printers
With FolderMill, you can send groups of documents to different printers. Simply create as many Print Document Actions as you need and choose different printers there. FolderMill will process incoming files and distribute them to different printing devices.
Combine file conversion with printing
FolderMill is all about multitasking! Our software can take care of your routine processes and combine different tasks, such as conversion and printing at the same time. For example, your JPG files can be converted to PDF and printed on a selected printer.
Didn't find a solution for you?
Not sure whether FolderMill can do the job? Having trouble configuring our software?
Missing that bit extra for FolderMill to get the job done? Don't hesitate to contact our customer support, and we will do our best to help you.