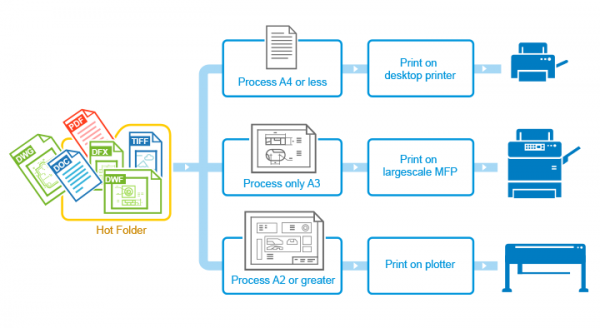
When you place documents into FolderMill's Hot Folder, the program processes all incoming files by default. However, you can send specific documents to specific printers – depending on file attributes, such as the size of their pages. So, if you want certain files coming to the same Hot Folder to be processed differently, use Actions based on filters.
Filter by… Actions can include or exclude files from processing depending on file name, file contents, number of pages, or page size which will be covered in this article. These Actions must be used in combination with other Actions, such as Print Document, Convert to Image, Convert to PDF, in order to take effect.
Usage example: This Action can be especially useful if your work is related to design or engineering, technical documentation, CAD / CAE / CAM systems, and you print different CAD drawings of different page size or format. It allows you to assign different tasks depending on a type of document with the help of pre-defined paper size filters. For example, you can automatically:
- send A4-sized support documentation to a regular MFP printer;
- plot your A1 or A0 large scale images or drawings on a plotter.
Besides, if you wish to keep a copy of your printouts on your PC, just add another Action, which would save processed files in a specific folder, for example, in TIFF or PDF format.
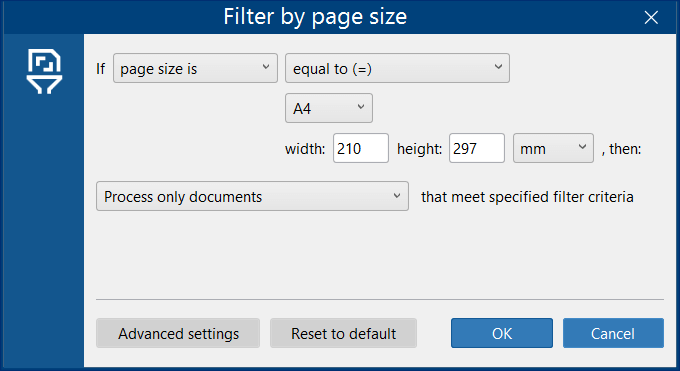
Filter by page size Action menu lets you set Action parameters according to document's page size dimensions with operators "greater", "less", "equal", and more. Besides page size, you can filter incoming files by page orientation. Just select "If page orientation is Portrait/Landscape…"
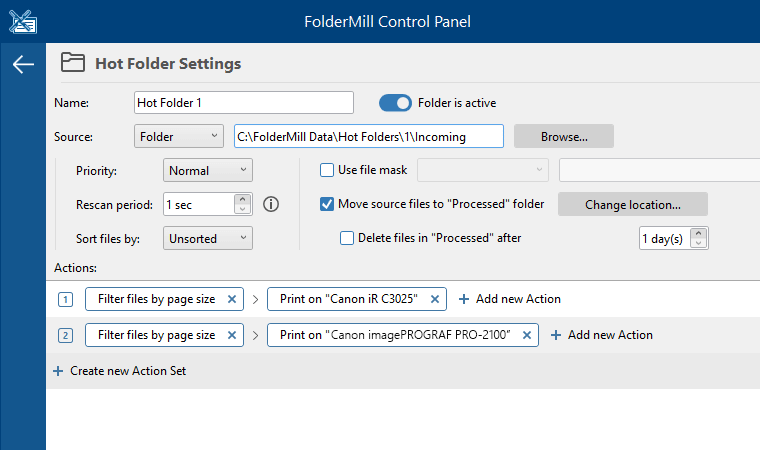
This Action gives you a great variety of processing options. Its most popular application is sending certain documents to different printers and/or printer trays.
Quick steps to use the Filter by page size Action
- Create a new Hot Folder;
- Create a new Action Set;
- Select Filter by page size Action;
- Choose the "If page size is" option, e.g., less than or equal to (≤) and A4 format;
- Add a primary Action in the end, e.g., Print document;
- (Optional) Create another Action Set below and repeat steps 3-5, but choose other Filter parameters and another printer (or another printer tray/printing preferences);
- Click Apply changes;
- Start file processing by pressing the Start button.
Selecting the comparison operator
Filter by page size lets you define page dimensions with the use of operators:
| equal to (=) | equal to selected paper size or Width x Height |
| greater than (>) | greater than selected paper size or than Width x Height |
| greater than or equal to (≥) | greater than or equal to selected paper size or Width x Height |
| less than (<) | less than selected paper size or Width x Height |
| less than or equal to (≤) | less than or equal to selected paper size or Width x Height |
Selecting the page size
You can set a custom size (Width x Height) or select a pre-defined page size like A4 or Letter.
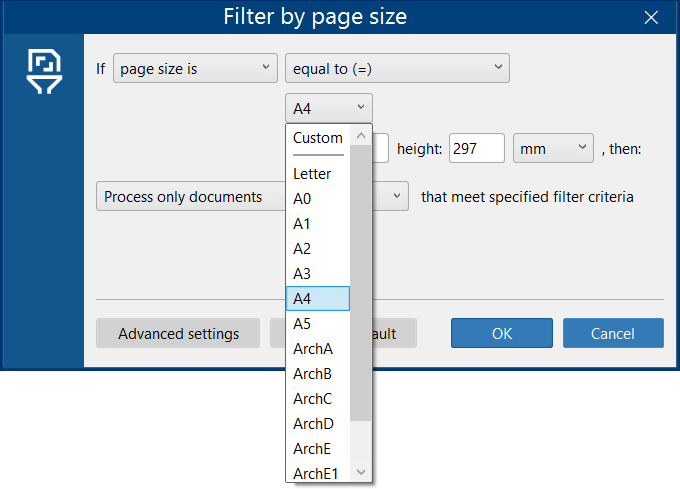
The list of available formats includes the most popular page formats, but if you need to use a format, which is not present here, you can select Custom. Width and Height can be specified in millimeters (mm), centimeters (cm) or inches (inch).
Selecting the Filter mask
You can choose between options:
- Process only documents — only documents (files) matching the Filter criteria will be passed on to the following Action and processed accordingly;
- Process only pages — only pages matching the Filter criteria will be passed on to the following Action and processed accordingly;
- Process all documents except those — all documents (files) except those matching the Filter criteria will be passed on to the following Action and processed accordingly;
- Process all pages except those — all pages except those matching the Filter criteria will be passed on to the following Action and processed accordingly.
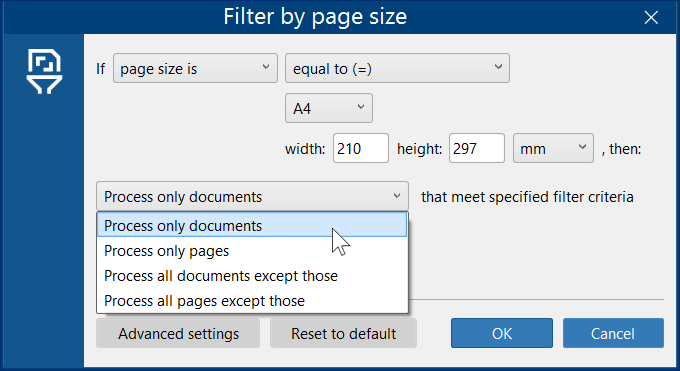
Once the configuration is complete and FolderMill is running, the files that appear in the Hot Folder will be filtered depending on page or document size and only those that meet the specified criteria will be sent further to the following Action in the Action Set. For example, they can be printed on different printers or printer trays, or the same printer but with different printing preferences.
Depending on your needs, you can create several Action Sets and use different parameters in each Action Set to distribute documents to the desired destinations.
Setting up multiple Filters to distribute groups of files to different printers
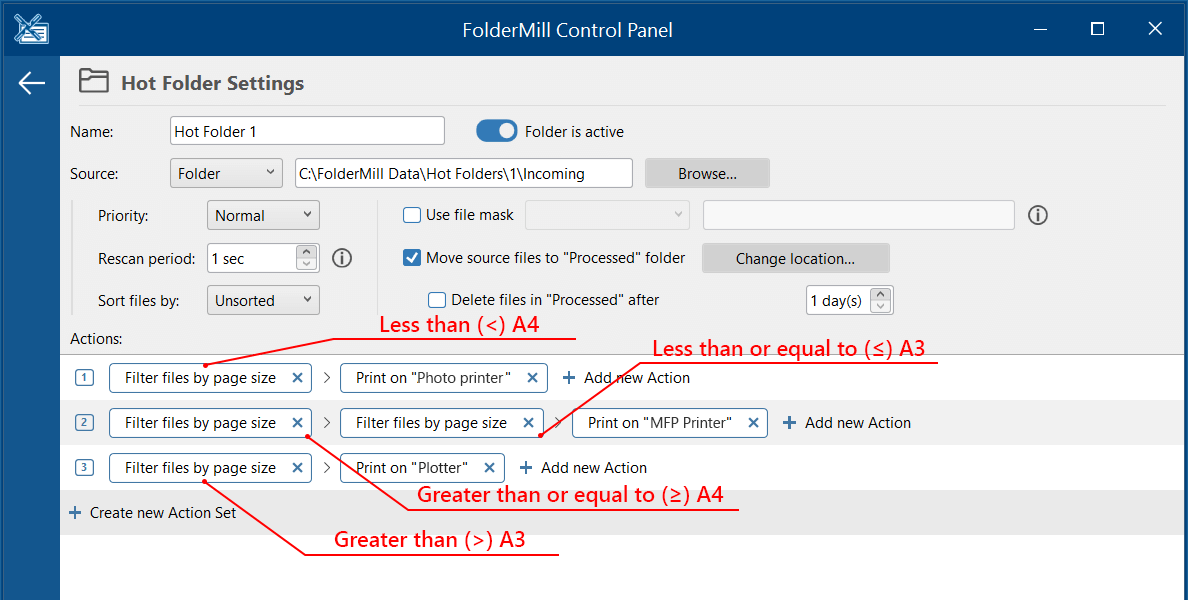
You can set up more complex filtering based on page/document size. For example, high-quality photos should be sent to a compact photo printer, regular A4-A3 documents to an MFP ("regular" printer), and large-format materials — to a plotter.
For this task, you'll need to:
- Create several Action Sets depending on how many groups of documents you have;
- Add and configure one or two Filter by page size Actions per each Action Set;
- Add the Print Document Action at the end of the Set.
Below is an example of how you can set it up.
The example configuration on the screenshot above will result in:
- documents less than A4 format going to Photo printer
- documents greater than or equal to A4 and up to A3 format going to MFP Printer
- all other documents larger than A3 going to Plotter

Don't forget to add a final Action at the end of the Action Set (e.g., Print Document Action).
You can make your own variations and combine several filters in order to find the best solution for your document flows. If you have any difficulties or questions on filtering files by mask, please don't hesitate to contact us.
