With FolderMill, you can automatically print incoming emails on a chosen printer, convert them to PDF, or use some other Actions. Using Email as a Source in FolderMill is a convenient way to automate the processing of incoming emails.
- Setting up Email as Source with IMAP step by step
- Things to consider for Gmail
- Things to consider for Outlook (Office 365 Mail)
- Tips & tricks
- How do I print only the message (email body), or attachments, or both?
- How do I automate printing emails if I already have them saved as EML or MSG
- What's the difference between IMAP and POP3?
- What authentication methods are available?
- What rescan period would be better?
- Can Email be used as a destination?

Warning: We highly recommend creating a separate mailbox to be used with FolderMill only. This will prevent emails intended for FolderMill from getting mixed with any other correspondence. However, if creating a separate mailbox isn't an option and you're confident about the process, proceed. With the correct setup, everything should work well.
Creating a separate mailbox and forwarding copies of emails to it for processing by FolderMill is recommended. This approach will protect emails that should not be processed or marked as "read", ensuring the safety of your existing workflows.
Setting up Email as Source with IMAP step by step
Step 1
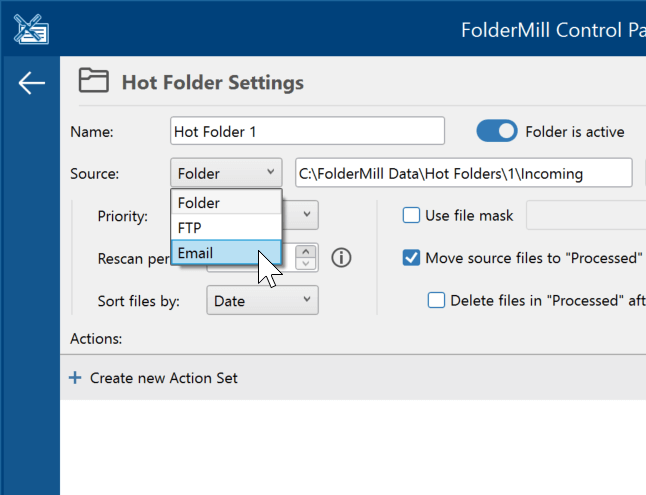
Create a new Hot Folder and select Source: Email;
Step 2
Click the Configure button next to the Source. On this window, you'll need to configure mailbox access for FolderMill;
Step 3
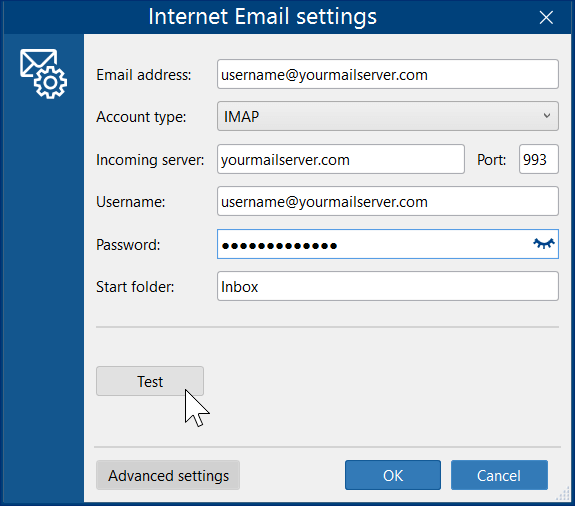
Fill in all the fields in the Internet Email settings window and click Test.
| Email address | Enter the mailbox address. Type your complete email address, such as username@gmail.com |
| Account type | Select account type: IMAP. IMAP and POP3 protocols are supported (what's the difference?). POP3 is available upon request. Please contact our Support Service to get instructions if you want to enable POP3. |
| Incoming server | Enter the mail server address. If you don't know this address, please contact your system administrator. Mail server address examples:
|
| Port | Server port number. Do not change it if you're not sure. |
| Username | Username is either your full email address or the username provided by your system administrator or mail service provider. |
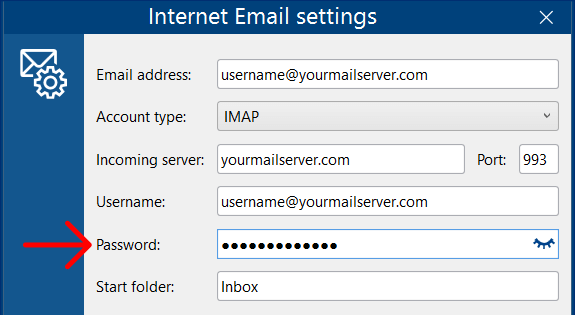
| Password | Enter password to access your mailbox. Usually this password is case-sensitive. 
The "default" password (your personal password that you normally use to access your mailbox via the web interface) may not work. In this case, set up and use an external app password.
|
| Start folder | This is a folder in your mailbox that should be checked by FolderMill. Default: Inbox. If you use the IMAP protocol, you can choose another folder inside the mailbox, for example, "Important", "Work", etc. Note: If you're using the POP3 protocol, this setting will not work, so leave this field empty. |
Important information about using POP3 protocol
Please note that the POP3 protocol doesn't support advanced features such as filtering by date or checking only unread emails. Therefore, FolderMill will download all the emails from your mailbox, including any archived emails. If you have an archive in your mailbox, FolderMill will process all these emails as well. We strongly recommend using POP3 only if you have a dedicated mailbox for FolderMill, so it doesn't interfere with your other correspondence.
POP3 is available upon request. If you wish to enable it, please contact our support service for instructions.
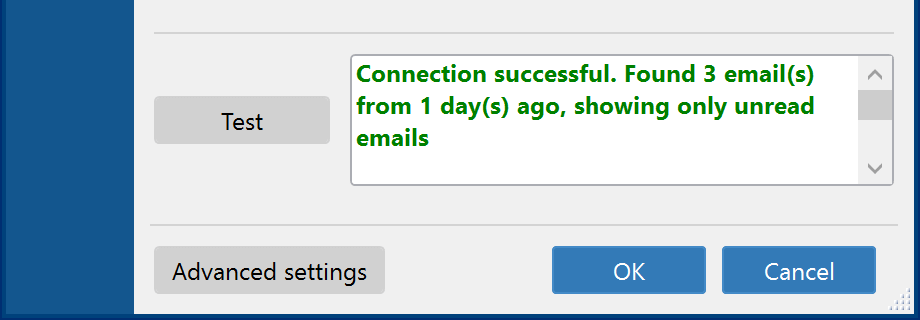
Click the Test button. If the configuration is correct, you will see a "Connection successful" message:
If FolderMill cannot access your mailbox, after clicking Test you will see an "Authenticate failed…" message or any other message returned as an error from your server. Please contact your system administrator to get the correct settings.
Step 4
(Optional) Set up input filters in the Advanced settings.
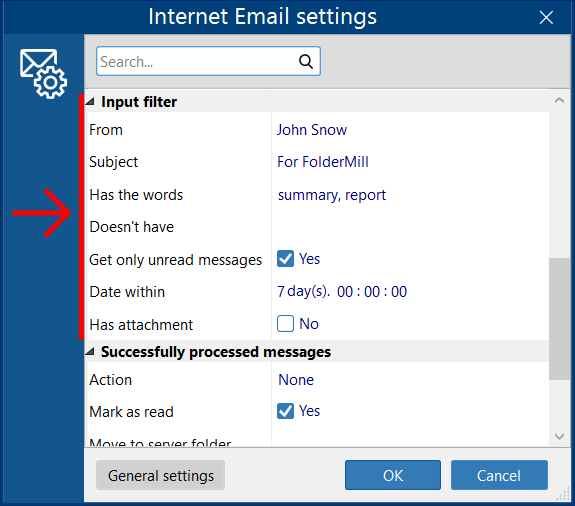
By default, FolderMill retrieves all unread emails (Get only unread messages:Yes) found in your mailbox from the past day (Date within:1 day). You can modify these settings based on the filters shown in the screenshot above.
If an email does not meet the criteria you have set, it will be marked as an error in the Control Panel and moved to the "C:\FolderMill Data\Unable to process" folder.

Note: Due to the variety of email services available, some filters may not function if a particular service does not support them. Please report any issues you encounter regarding this matter.
Step 5
(Optional) Configure post-processing actions in the Advanced settings. You may also configure post-processing — see sections Successfully processed messages and Messages that failed to process.
Under these sections, you can set an additional action on successfully processed messages. By default, FolderMill marks messages as read (Mark as read: Yes) only, but you can choose to delete messages from the remote server (Action: Delete) or move to another folder (Action: Move to server folder (for IMAP only)).

Warning: enabling Action: Delete will make FolderMill download emails to your local computer and delete them from the mail server for good without the ability to recover them.
Step 6
Add the desired Action(s) using FolderMill's Action Set. For example, add Print document for printing or Convert to PDF Action for archival purposes (or both);
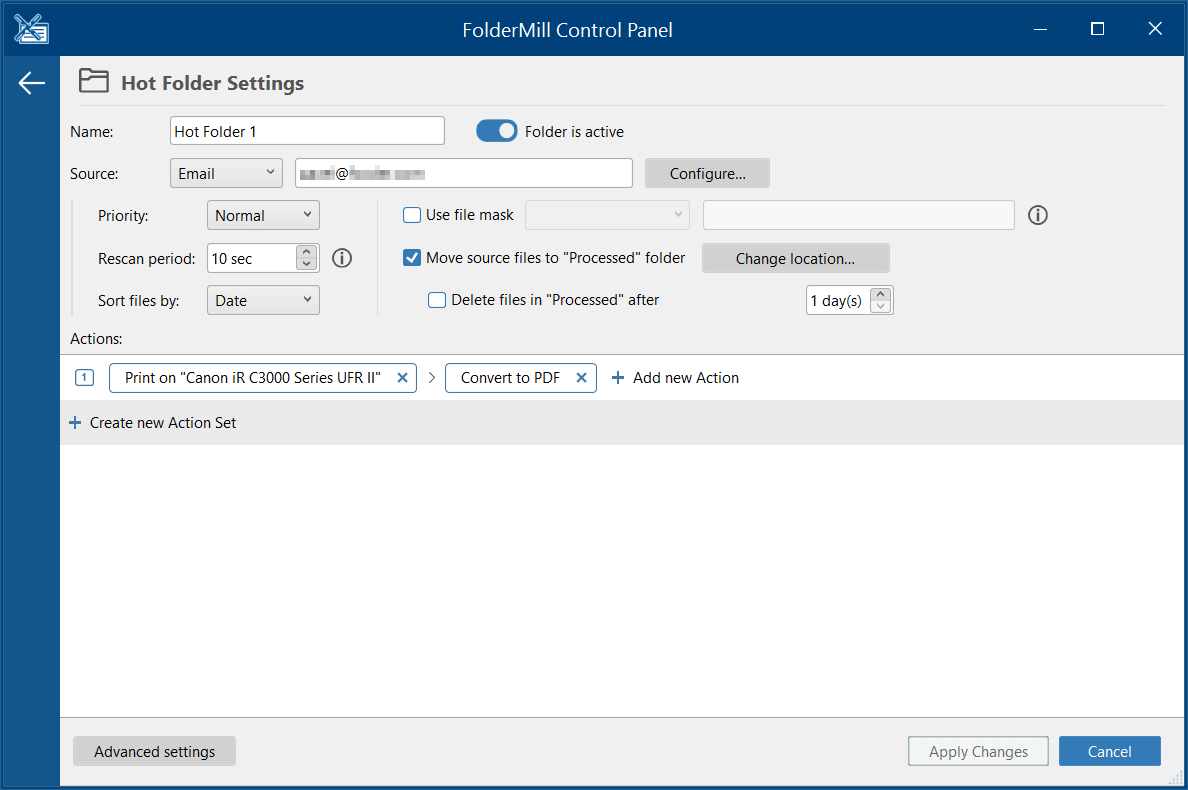
Step 7
Click the Start button to enable FolderMill Processor.
Now, when new emails appear in the mailbox (and if they meet the Input filter criteria you specified), they are automatically processed by FolderMill. Go ahead and try processing a few emails as a test!
Note: By default, FolderMill processes unread emails only. If you use a mail client that checks this box, it may mark the emails as read. In this case FolderMill will not process them. To change this, open Advanced settings of Internet Email settings and disable the setting Get only unread messages:
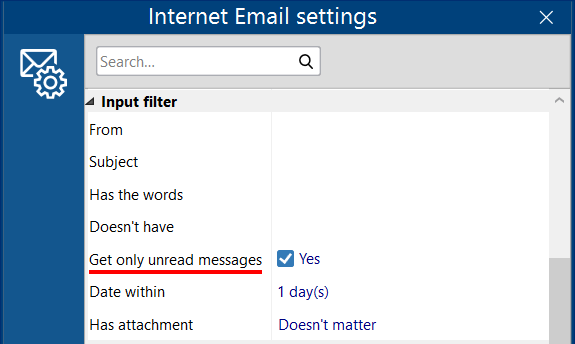
After processing by FolderMill, the emails will be marked as read.
Things to consider for Gmail
When using Gmail as a Source, you should:
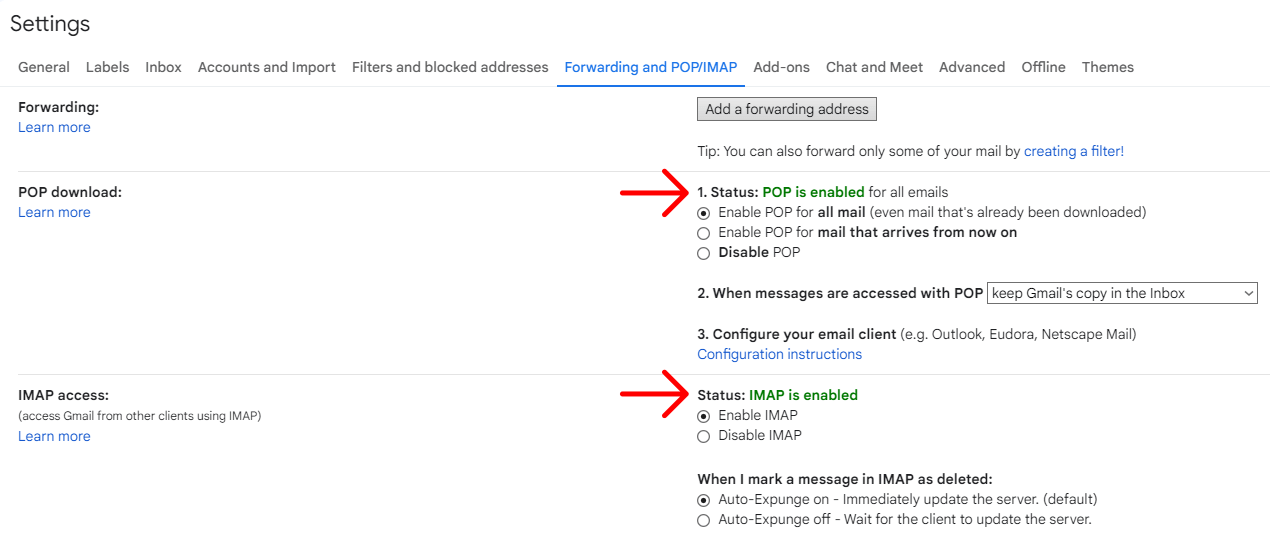
- Enable IMAP and POP3 in Gmail settings
- Generate and use external app password
How to activate IMAP and POP3 in Gmail
- In Gmail, go to Settings (the cog icon in the top right corner) and select See all settings;
- Open the Forwarding and POP/IMAP tab;
- Turn POP download & IMAP access on and click Save.
How to generate an external app password for Gmail
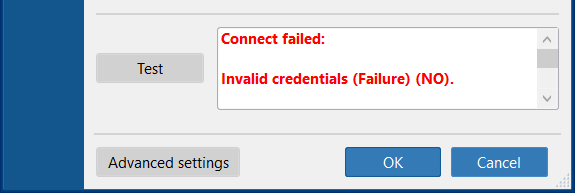
If you encounter the error "Connect failed: Invalid credentials (Failure) (NO)" after clicking the Test button, ensure that you have entered the app password (not the one you typically use for your Gmail account).
Application passwords give an app (including FolderMill) or device permission to access your mail account via POP3/IMAP protocol. You usually set up an application password only once.
Note: to generate and use app-specific passwords, your email account must be protected with two-factor authentication.
To generate an app password in Gmail:
- Log into your Gmail account;
- Open link: https://myaccount.google.com/apppasswords;
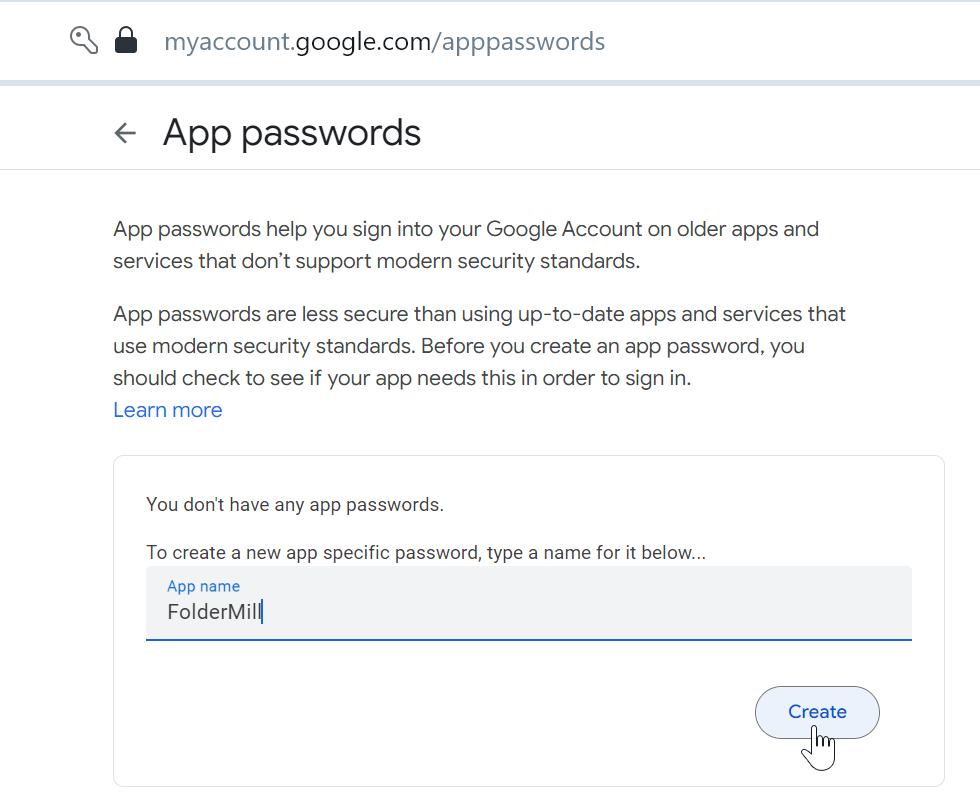
- Follow on-screen instructions. If prompted, under Select app, choose Mail, and under Select device choose Windows computer;
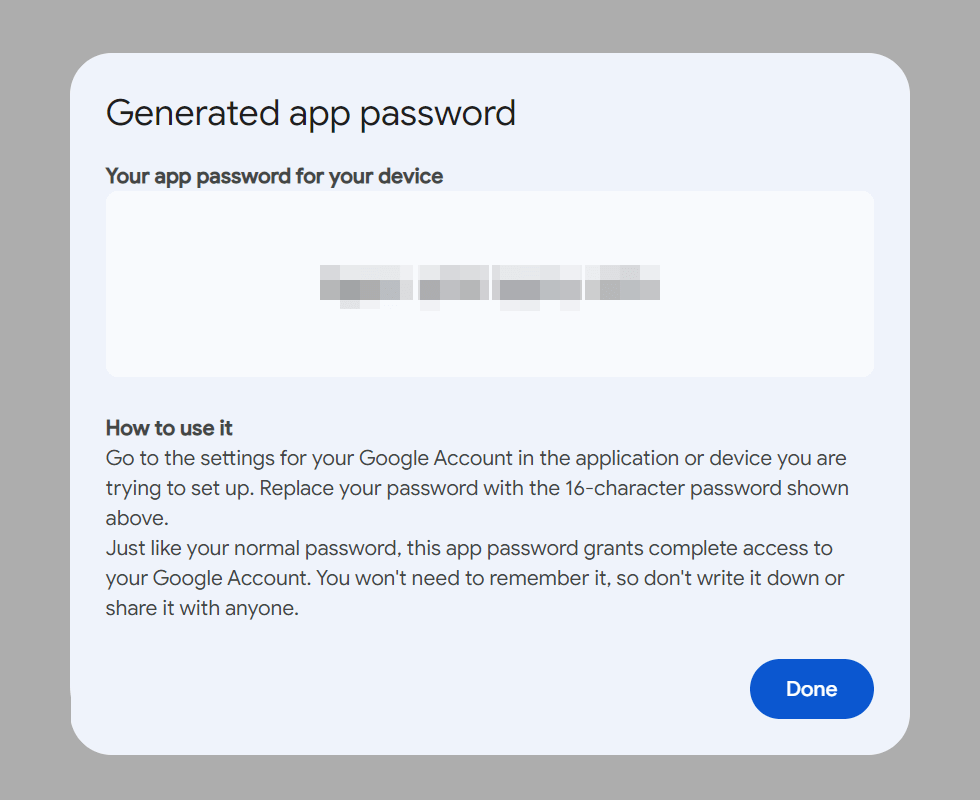
- Once the app and device are selected, click on the Create button. Then, copy and save the password somewhere. Click Done.

Once generated, the app password is usually shown only once. Write down the password or save it in a secure location — for instance, your password manager app.
Once you have the new password, enter it next to the Password field in FolderMill:
More information on the official sites
How to create & use app passwords in Gmail →
Things to consider for Outlook (Office 365 Mail)
When using Outlook (Office 365 Mail) as a Source:
- Choose the OAuth20 (OAuth 2.0 protocol) as the authentication method
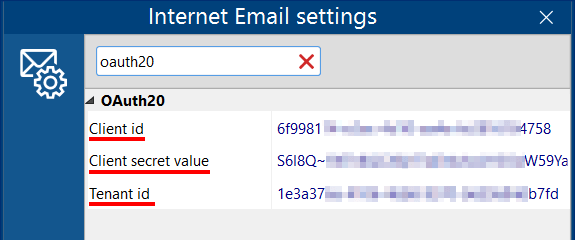
- Enter Client ID, Client Secret Value, and Tenant ID
How to select OAuth 2.0 Authentication method
To select OAuth 2.0, the protocol for authorization, open the Advanced settings, find Authentication, and select OAuth20:
How to enter Client ID, Tenant ID, and Client Secret values
Open the Advanced settings, and enter values for Client ID, Client Secret Value, and Tenant ID.

Need help with OAuth 2.0 authentication?
More information on the official sites
How to manage app passwords in Outlook →
Tips & tricks
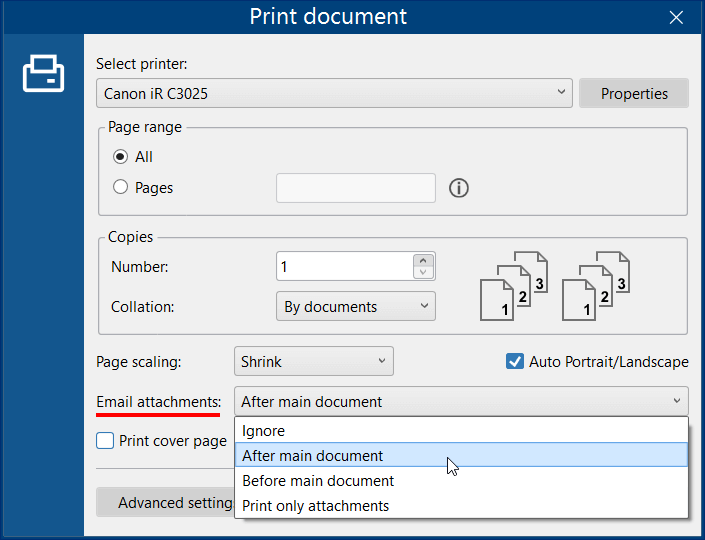
How do I print only the message (email body), or attachments, or both?
By default, FolderMill processes the entire email including its attachment(s). But you may want to print only the message text or the attachments. To do this, change the setting Email attachments on the Print document Action's configuration window.
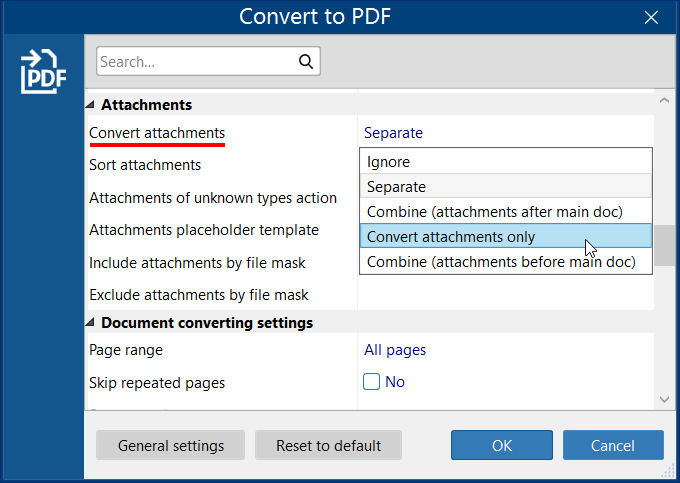
If you're using the Convert to… Action, open the Action's Advanced settings and adjust the handling of attachments next to Convert attachments, under the 'Attachments' section.
How do I automate printing emails if I already have them saved as EML or MSG files?
This will be even easier than setting FolderMill to monitor your inbox. Just create a Hot Folder, create the Print document Action and choose a printer. Then copy your EML or MSG file(s) into the Hot Folder. All incoming email message files will be printed automatically.
What's the difference between IMAP and POP3?
Both POP3 (Post Office Protocol) and IMAP (Internet Messaging Access Protocol) are used to retrieve messages from the mail server. We recommend FolderMill users to choose IMAP protocol since it is newer and better supports input filters. Generally, IMAP is more flexible and complex than POP3. Learn more about the difference →
What authentication methods are available?
FolderMill needs to have access to the mailbox you specified in order to get emails from it. To grant this access, you can use two types of authentication that can be selected in the Advanced settings:
- Username and password
- OAuth20 (OAuth 2.0)
What rescan period would be better?
The default Rescan period (1 second) would be too short for the Source: Email. It is recommended to increase it to at least 10 seconds in the Hot Folder Settings.
Can Email be used as a destination?
Yes. Sending files to a mailbox automatically is also possible with FolderMill via SMTP (Simple Mail Transfer Protocol). For this task, use the Send to Email Action to send processed files by email.

Setting up Email as Source may be tricky. If, after reading this article, you are still not sure about the right configuration for you, please contact our support for help before taking any action.
